Saturday, 30 November 2013

ONA Coffee's Cupping Room

ONA Coffee has just opened a new outlet in Civic, the Cupping Room, and it's a must-see for any Canberran or visiting coffee connoisseur.

ONA Coffee has been roasting their own beans in Canberra since 2007. What they lack in an impressive establishment date is more than made up for with the quality of their product. One of only two ACT coffee roasters to win medals in the Sydney Royal Coffee Competition—a category of the Sydney Royal Fine Food Show that was established in 1998—and operating their own bean sourcing programme direct from coffee farmers in India, Central and Southern America, they have a fast-growing reputation for excellence.

Their Fyshwich Coffee House and Roastery has been a favourite cafe of mine since moving to Canberra, despite its distance from my Northside home. I was more than a little excited to hear they were opening a new café in Civic, and not just because it was right next to the university campus where I spend my weekdays.

Photo courtesy of Jessica Hancock.


Exquisite latte art, as always.
The doors of the stylish new venue on London Circuit opened last Saturday to admit Canberra's coffee lovers and I arrived soon after. On the advice of the Fyshwick staff, I've swapped my usual brew from latte to a flat white and I started off with an Organic Blend flat white. In most cafés, their organic coffee offering has exchanged excellence for its name. Whereas the organic coffee served by ONA has reached such high quality that they now serve it as their house blend, supplanting the already exceptional Malawian Mocha and ONA Signature blends. Hints of dark chocolate and caramel make it a favourite of mine for any milk based coffee.

Photo courtesy of Jessica Hancock.
The day was warming quickly and another ONA favourite was soon sampled, their cold drip. Stylishly served to match the mad scientist equipment used to produce it, the cold drip is delivered in an old-fashioned medicine bottle with a similarly old-fashioned label. Lacking even a trace of bitterness, cold drip is an ideal drink for anyone still taking their first baby steps in the coffee world. It also makes an excellent summer beverage for even the most discerning of coffee connoisseurs.
The Cupping Room's coffees lived up to the ONA name admirably, but the new venue has something more on offer that sets it apart. Between the espresso machines and the kitchen is an offering new to Canberra: a bar lined with stools, at which a few unusual coffee offerings are prepared. This is the heart of the Cupping Room, the filter bar, where their pourovers are poured, aeropresses are pressed, cold-drips drip slowly away and freshly roasted beans are cupped.

ONA founder, Sasa, prepares pourovers at the Cupping Room's
filter bar. 
Photo courtesy of Jessica Hancock.
Lured in by the mid-week free coffee day, I returned to the Cupping Room with a group of caffeine addicted postgraduates a few days later for a study session. For some, this was their first introduction to ONA and they were generally impressed by what they discovered. One persona non-drinker of coffee, tea or hot chocolate, who found his meal choices restricted by his low-carb diet, dislike of fish and egg, and an aversion to ordering custom dishes—sampled only sips of the coffee on offer, but still enjoyed the atmosphere. Then, as the studying wound to a close, we had the chance to take part in a cupping.

Roaster, Gus, checking the smell of his latest
roasts. 
Photo courtesy of Jessica Hancock.
Cupping is a scene reminiscent of a wine or whisky tasting, with the anonymous coffees lined up along the bar. The "crust" of coffee grounds is first broken to release the aromas of the mysterious brews and then scooped off. The unfiltered coffee beneath is slurped in a most undignified manner, spreading it evenly across the tongue. From these tests, roasters can check the quality of each batch of beans, pick out the individual flavours and refine the roasting process to match. Customers at the Cupping Room have the chance to take part in the process under the guidance of ONA's expert coffee roasters. We were treated to samples of seven different single origin roasts, including a taste of the rare and intensely aromatic geisha, a legendary coffee varietal that has been breaking world price records since its discovery by the world markets in 2004. I was at a loss to describe its powerful aromas and flavours (were those floral notes? Berries, perhaps plums?but could appreciate their exquisite combination.

The Cupping Room's food menu is worth exploring.
Like ONA's other venues, the Cupping Room provides excellent food to accompany their range of espresso, pourover, aeropress and cold brew coffees. Their new menu is a fusion of flavours inspired by South American cuisine, and their all-day breakfasts boast a few unusual takes on the typical Australian offerings.
"Not So Benedict" takes eggs benedict, then adds
silverside and a mustard sauce.
"Dragon Eggs" are avocado halves, filled with mildly
spiced guacamole and topped with poached eggs.
The banana hotcakes include a hint of salt to offset
their sweetness.


Also check out ONA's video, Cup A Wonderful World. Bonus points for spotting the author of this blog.

Friday, 22 November 2013

Homemade Bone Stock

Eating lunch at a recent first aid course, I got a surprise supply of ingredients. The organisers had a couple of supermarket roast chickens to provide some sandwich fillings, the carcasses of which were abandoned at meal's end. I snapped them up quickly and took them home to make myself some stock.

Store-bought stock tends to be tasteless (apart from the overwhelming taste of salt) and I've been a staunch supporter of making my own for a few years. It started when my local shop started packets of turkey bones, wings and necks, all the bits that don't look good in the Christmas family photo. It wasn't December, but enough Australians hold a Christmas-like celebration around June 25th (which is now bizarrely being called Christmas in July, apparently named after the entirely unrelated United States tradition intended to boost retail sales) that turkey can become reasonably prevalent in the frozen section of shops during June. I got a few assorted "offcuts", marinated them and shared a decent meal with some friends. But afterwards, I was left with a pile of bones... and decided to learn how to make stock from them. This recipe is the result of a few adaptations leading up to the present day, and needs little or no adaptation to be used with turkey or beef bones.

Chicken Bone Stock
Ingredients


  • 2 chicken frames
  • 1 onion, skinned and chopped into eighths
  • 1 leek, including green section of stem
  • 1 bunch celery, including leaves 
  • 1 carrot
  • 2 bay leaves
  • 2 sprigs parsley
  • 1/4 C vinegar, apple cider or white wine
  • black peppercorns
  • 2 egg whites, to clarify the finished stock
Directions


  1. Cut chicken frames into chunks and place in your stock pot if it is oven-proof, or spread in a roasting dish if its not. Bake for 15-20 minutes at 180°C (fan forced), turning as necessary, until the pieces are golden brown. Cooking time will vary depending on whether you're using cooked or raw carcasses. Do not allow bones to burn. Take out of the oven and allow to cool.
  2. Chop the green top off your leek and cut it (the green section) into 3cm lengths. This recipe does not require the white flesh, so you can use that for one of the many recipes that demand no green leek be included. Chop the leafy tops off your celery. Again, leaves work just as well as stalk for this recipe, so you can use the stalks elsewhere. Chop carrot into 3cm lengths. Rinse parsley and all vegetables then add to your stock pot.
  3. If you baked the bones in the stock pot, skip ahead to part 4. If you baked your bones in a roasting dish, add these to the stock pot. If there are any juices in the dish, pour these into the pot as well (don't worry if they include chicken fat. You can remove the fat later. If there's any caramelised juice on the dish add some warm to dissolve it and pour this into the pot. 
  4. Add the vinegar (apple cider or white wine), bay leaves and pepper to the pot and pour in enough cold water to cover. Bring to a simmer over medium heat (do not allow to boil vigorously), reduce to low and leave at a gentle simmer for 4 hours.
  5. Straining your stock is easiest if done in a couple of steps and requires another pot or a large bowl big enough to hold your stock, a colander and some muslin or cheesecloth. Place the colander over the second pot. Pour the stock through, discard the chunks left in the colander and rinse your stock pot. Place a piece of cheesecloth in the colander, and place over your stock pot. Pour the stock through.
  6. Now for the egg whites. Keep the colander and second pot handy; you'll need them again. Put the pot of strained stock back on the stove and bring back to a simmer over low-medium heat. Beat egg whites with 2 tablespoons of cold water, then pour into the stock and leave for several minutes. The egg white should form a "raft" on the surface, to which sediment in the stock will bind. Remove from the heat and strain through cheesecloth to remove the egg whites. Place stock in the fridge to cool.
  7. Once cold, any fat in the stock will form as solid crust on the top. Skim this off and your stock is ready for use. It can be used immediately, or frozen in smaller containers for later use.


Stock before and after filtering with egg white.

Monday, 18 November 2013

Poppies, cheese and oranges collide to produce... cheesecake, funnily enough.

In the interests of full disclosure, I must warn any potential readers that half this post is about language and the process of devising recipes, not about cheesecake at all. If you want to skip to the part with an actual recipe, it's posted separately under Orange and Poppyseed Cheesecake.

My love for baked cheesecakes starts somewhere quite unusual, I suspect. It began as an expletive.

Surrounded by overwhelming quantities of anatomical descriptions, blasphemies and cultural references to choose from when requiring an expletive, I found them all lacking. What I needed was an expletive I could use when everything had just turned to brick and I wanted to declare as such boldly, loudly and (above all) without recriminations from everyone nearby. I took to using several, one of which was—for no apparent reason—"cheesecake." After declaring "Cheesecake!" for a year or more, whenever I stubbed my toe, misplaced my wallet or my computer bricked and I lost an hour's work, it seemed high time I learn to actually make this dish whose name I'd been misusing. I found a recipe online and started experimenting. The results were mixed (my habit of tampering with the ingredients proved deleterious, since I hadn't yet worked out what could be changed safely) but I produced a few passable samples.

Then I decided to make a birthday cake, a birthday cheesecake to be precise, and wanted to make something a little different. There are literally (OED, definition I1b not sense I1c) hundreds of thousands of different recipes scattered across the internet, but none of the ones I looked at were quite what I was after. I wasn't exactly sure what I did want, so it was experimentation time.

My old engineering self insisted that stage one was a tabulated comparison of the nicest looking recipes I could find, and then analyse for commonalities in their ingredient ratios. Naturally, the results were pretty varied, but not quite random. While there were instances of higher and lower quantities of absolutely every ingredient, a common thread appeared to be:

Crumb:
Biscuits : Butter + (optional) Nut Meal : Butter
2 : 1 + (optional) 4 : 1

Filling:
Sugar : Eggs : Cornflour : Cheese : Vanilla Bean Paste : Sour Cream (optional)
155g : 3 Eggs : 1 Tablespoon : 500g : 1 Teaspoon : 300ml

Cheese of choice mainly varies between philadelphia*, mascarpone and quark, with a few other options on the side. Chocolate was sometimes mixed in to the filling, accompanied by a slight decrease in the quantity of sugar.

It was a start, and gave me something I could tinker with. One concept that particularly intrigued me was the introduction of nut meal into the crumb, partly for flavour but presumably for texture as well. There were also a large number of recipes incorporating either molten or grated chocolate into the filling. Never having done either before, I pulled out my single-serve springform pie tins and made some miniature cheesecakes.


One recipe called for hazelnut meal, which I decided to test. After sampling, I can confidently say that it's a bad idea unless you really really love hazelnut, as it was extremely overpowering. As for the choice of adding molten vs grated chocolate, the preferences from those who sampled them were consistently for the molten chocolate.

So now to choose a flavour...

I have lost count of the number of passionfruit cheesecakes I've made (of both the baked and bushwalking varieties) and can't say I was keen to just make another one of them. I contemplated combining dark chocolate and raspberry, one of my all-time favourite flavour combinations, but decided cheesecake would prove a poor medium to convey it. Butterscotch seemed promising in combination with white chocolate, and I was working out a recipe when an unusual thought struck. Orange and poppyseed...

I was inspired by a cake my housemate had made around a month ago, which had poppy seeds ground to a flour and mixed through one layer. It was a delicious cake and I'd had half a mind to incorporate the technique into something for a while.

Baked cheesecake consists of two to three layers: the crumb, filling and an optional topping. I tried to make different flavours dominant in each layer. I crushed some Nice biscuits (I tried to use scotch fingers out of curiosity in the test cheesecakes, but Nice work much better) and mixed in coarsely ground poppyseed instead of nut meal, with a little orange zest for a subtle citrus flavour. Into the filling, I added no small quantity of white chocolate (it makes the cake wonderfully rich), some finely ground poppyseed (I didn't want any crunch in the filling's texture), lashings of orange zest and juice. Two miniature cheesecakes were baked alongside the main dish and I tested these with and without a topping made from thickened orange juice.

The final cake suffered slightly from the inaccuracy of my oven's thermostat (I may need to install an oven thermometer to monitor this manually), with a couple of cracks forming in the top, but was satisfactory. It was a cheesecake, definitely a cheesecake, but the texture change wrought by the poppyseed made it a most unusual one. The crumb was firmer than usual, and held together better than the same recipe without poppyseed. The filling was slightly denser and lay somewhere between a dense, moist cake and a cheesecake.

Were these changes for the worse? No, I don't think so, nor for the better. I prefer this style of crumb, but others may prefer a more traditional texture. The resulting cake is just different a style. I may yet consider some refinements to add in another iteration but the recipe as it stands certainly produces an unusual but delicious cheesecake. If you'd like to try making it, the recipe is here.

* My browser is insisting this should be capitalised, but I disagree; philadelphia has become a genericized trademark for a particular type of cream cheese in colloquial usage. It has not yet have achieved sufficiently widespread usage to appear in dictionaries as such. Nevertheless, that is how it is being used in everyday speech.

Orange and Poppyseed Cheesecake

This recipe arose from some experimentation with the cheesecake concept, which I have posted about in more detail here.

Ingredients:

  • 250 g Nice* biscuits
  • 1 tbsp demerara sugar (or large-grained raw sugar)
  • 50 g poppyseeds
  • 140 g unsalted butter, melted
  • 500 g cream cheese at room temperature
  • 1/2 C castor sugar
  • 120 g white chocolate, melted
  • 300 g sour cream
  • 1 tbsp cornflour
  • 3  eggs
  • 3  oranges
  • 1 tbsp cornflour (for topping)
  • 1/4 C castor sugar (for topping)
  • 1 tbsp lemon juice (for topping)
Directions:
  1. Line a 22cm springform pan with baking paper. If using a smaller tin, or one with low sides, reduce quantity of filling accordingly.
  2. Use a microplane† or grater to remove the zest from the oranges, and set aside. Juice the oranges, and set aside.
  3. Using a food processor or mortar and pestle, crush the biscuits to a fine crumb. Using a spice grinder or mortar and pestle, grind half the poppyseeds roughly then combine with the crushed biscuits, melted butter, demerara sugar and ~1 tbsp of the orange zest. Spread over the base and up sides of springform pan, pressing into place using a straight sided glass. Cover with plastic wrap and refrigerate for at least 30 minutes.
  4. Preheat oven to 150°C (130°C fan-forced). Using an electric beater, beat the cream cheese and the castor sugar (1/2 cup) together until light and smooth. Mix in the eggs, one at a time, followed by the sour cream, chocolate and 1 tbsp of cornflour. Beat until smooth. Using a spice grinder or mortar and pestle, grind the remaining poppyseed to a fine powder and add to the cream cheese mixture with half the orange juice and half the remaining orange zest. Beat until smooth.
  5. Pour cream cheese mixture into the prepared cake tin. Mixture will expand slightly while cooking, and must only be filled to slightly below the top of the crumb. Bake for 50 minutes, or until cheesecake is set in the centre. Turn off the oven and leave the cheesecake in it with the door slightly ajar to cool for 2 hours. Cover with plastic wrap and refrigerate for 4-6 hours to cool completely.
  6. To make the topping, combine the remaining orange juice with the lemon juice and top up with water to 250 ml. Add 1 tbsp of this liquid to 1 tbsp of cornflour in a saucepan and stir until combined. Add the remaining liquid, 1/4C of castor sugar and remaining orange zest and stir to combine. Place on medium heat, stirring until it boils and starts to thicken. Allow to cool slightly then spread over the top of the cheesecake. Refrigerate until set, then serve.
* Nice biscuits are my preferred choice for use in cheesecakes, but any plain biscuit will work.
† While I'm generally against adding gimmicky gadgets to my kitchen, I have been thoroughly won over by microplanes, which are a similar to a fine grater, but can actually grate parmesan cheese quickly, remove the zest from an orange without clogging up, finely grate garlic without having to remove the skin and can be cleaned easily (and no, they don't sponsor me).

Sunday, 3 November 2013

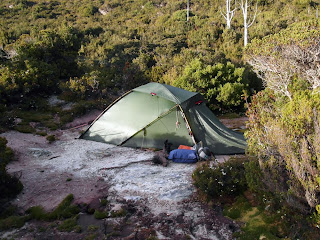
Hilleberg Jannu

The first time I heard about Hilleberg tents, I was pretty excited. They looked amazing and one of them was just what I wanted for the hike I was planning. This was the description that so caught my eye:

A midnight photography session captured a
frost-covered Jannu by moonlight.
The Jannu is that rarest of combinations – tremendously strong and exceptionally light. The Jannu is our strongest, ultra-lightweight dome tent model, and is in some respects the ultralight version of the Tarra, but with only one entrance. At the same time, it is very much its own creature. For while it is an Ultralight tent, it is nonetheless ideal for harsh, high altitude use, and both exposed and/or above tree line terrain and protected conditions in all seasons and all weathers. Its compact footprint shines in limited-space sites, such as knife-edge ridges and small ledges, and it is very stable, even in high winds. Yet it is also easily light enough for use on long distance trips where low weight is a high priority. The Jannu’s single entrance and vestibule favor lighter weight over absolute comfort, and its dome design gives it exceptional static strength for handling snow loading. As a result, it is a fine choice both for base camp situations, and for mobile adventures, where you pitch your tent every day.*

Companies are always saying wonderful things about their products though. After using it for a three-week bushwalk and on numerous shorter trips in varying conditions, this is what I think about the Jannu.

A Quick Clarification
The Jannu is a four-season tent. This term gets thrown around a lot, and I want to clarify what I take it to mean before we carry on any further. A lot of products titled as four-season gear are intended only for use in late Autumn to early Spring; they aren't suitable for Summer usage. Anything like that, I'll call Winter gear because it's less confusing and far more accurate. If a company claims four-season usability for their gear, its performance in hot weather is as important to me as its ability to withstand a storm.

Strung out to dry the day after a storm. Normally, only a
few guy ropes are required.
Photo: Jessica Hancock.
Pitching the Tent
The first thing I noticed when setting up the Jannu was jut how much space it filled. The footprint is surprisingly narrow, given how roomy the tent is, but it is long. I have never been unable to find a space for it, but on several occasions I have found only a single space long enough to fit its full length. Once a suitable site is found, the rest of the setup is pretty simple; one person can pitch the Jannu in about the time it takes another to put some water on to boil. Most of the guy ropes aren't needed unless you're expecting a hurricane but the three attached to the vent's rain cover are an absolute must; the tent won't ventilate without them (but more on the vent later). The peg-out points on the vestibule have an adjustable strap on them so that you can put the peg wherever you need to, to avoid rocks and tree roots, and then just adjust the strap to suit. This is a simple, elegant design feature that was greatly appreciated, but I couldn't for the life of me fathom why it hadn't been used on all the peg-out points. The tent body attaches to the fly with loop and toggles. These toggles are much smaller than are used for attaching the vent and can come undone while pitching the tent, although they're secure once it's erected. This has only happened twice in the 30+ times I've put the tent up and it was easily spotted then fixed both times.

Summer Storm Performance
Ducking outside for a quick brew during a brief
break in the weather. Photo: Jessica Hancock.
Two nights up on an exposed plateau with high wind, driving rain, sleet and hail certainly tested this out. No water got into the main tent, only the vestibule. This came from two sources: opening the zip to go in and out of the tent and part of the vestibule sagging slightly. No matter how level the campsite nor how I adjusted the the guy ropes, this sag was always present. The water ingress was minimal but, as the only leaking part of the tent, I've spent a lot of time trying to stop it. The Jannu's wind performance was outstanding; it can be set up each night according to convenience and space, not prevailing wind direction. The advantage of the semi-geodesic design is that it doesn't matter whether the wind changes direction. During the windiest conditions I have put it through, the inner tent wall barely moved.

Winter Storm Performance
The Jannu shed enough snow to stay upright
overnight, but it was starting to sag by morning...
In a recent backcountry ski trip, the campsite was buffeted by winds measured at 80km/h, received over 40cm of snow and dropped to a pleasant -6°C overnight. The Jannu had no problems with the wind, and (unlike another tent in the campsite) didn't need digging out during the night to prevent it from collapsing beneath the snow. It definitely did need digging out later, and I would have been uncomfortable letting much more snow build up on it, but it coped well. Only in the vestibule did the weight of the snow make much difference, where the usual sag partway along the zip had been exacerbated to the point where half the vestibule was unusable.

Sunny Day Performance
Sheltered from the wind, but not the sun. The
Jannu heated fast during this rest day.
I don't just camp in storms, and have used the Jannu on several warm days. Provided there was a breeze and I had set up the vent, the tent ventilated effectively and there was no condensation beading its surface come morning. In particularly sheltered campsites, it still ventilated and never became uncomfortably warm, but the difference in temperature was certainly noticeable and condensation started to bead the inner tent wall. Only once have I forgotten to peg out and open the vent (rest assured, I won't forget again!), and it meant waking up to a tent dripping with condensation. When confident that there wouldn't be any rain on a particularly still, warm night, I left the vent's rain cover off and enjoyed a pleasant night with no overheating issues or water droplets on my gear come morning. So the vent works provided there is either wind or no chance of rain.

Not really relevant to the tent quality,
but it made for a nice morning view.
Comfort
The Jannu is a roomy tent, easily big enough to fit three people (particularly if you consider how small many "two-man" tents actually are) or two people and the full contents of their packs. While spending a day sheltering from the rain, the Jannu was used as a communal space. Four adults could sit up quite comfortably inside it, playing cards while the back of the tent was devoted to preparing lunch. Regardless of the weather outside the tent, it remained a warm, quiet environment inside.

Build Quality
There is no doubt that the Hillebergs are well-made tents. The fabric is second to none, somehow being lighter, stronger and more waterproof than that used for other modern tents. After a 22 night hike, the Jannu looked as fresh and shiny as it had on day one. The lightweight poles are slightly thicker at the joints, the most common failure point on many tent poles. Tent pegs were easily driven into even the hardest packed rocky soil, while also being easily removed come morning thanks to the simple but wonderful addition of a loop of cord to the end of each.

Jannu Overview
The Jannu's semi-geodesic design makes for a very stable, reliable tent. It can be set up according to comfort and convenience rather than having to predict what the prevailing wind direction will be. It is (just) light enough to be used by a single person, but the spacious inner can easily fit two people and all their gear; however, the vestibule space is of limited use during rain due to sagging.

*Product description on the Hilleberg site.

Monday, 28 October 2013

Dunlop Volleys - The End of an Outdoor Era

When I started getting into white water rafting I tried a few different sets of river shoes, trying to find the perfect ones. There were pros and cons to each, but I ultimately settled on the same footwear as everyone else. Now, years later, it seems I may have to change styles again.

#1 Booties

The first was a pair of wetsuit boots—or "booties" as they're affectionately known—I already owned for snorkelling around oyster studded rocks. New to white water sports, I foolishly thought their impressive tread meant my booties would provide all the grip I needed both on and off river. While they remain the warmest river shoes I've ever worn, those boots taught me that impressive tread doesn't equate to good grip on wet rocks. In fact, the stiff soles glided easily across the smooth, wet river rocks.

#2 Fingers

So I upgraded soles, adopting a fancier pair of neoprene shoes. I took to wearing a pair of Flows, an early model of Five Fingers. They were comfortable, reasonably warm (apart from the unfortunate gap between the top of the shoes and the bottom of my wetsuit) and their gecko soles gripped surprisingly well on wet rocks. They suffered from only three problems:

  • The low tops meant they filled with sand easily when walking along the riverbank, extremely uncomfortable in a skin-tight shoe;
  • The stitching tended to tear through the thin neoprene, severely limiting their service life;
  • They cost around $200 a pair.
The first was bearable, but the combination of the latter two (and Vibram's refusal to acknowledge the rapidly deteriorating neoprene as a manufacturing defect) made them an impractical option for a student rafter.

#3 Sandals

I'm a long-standing user of hiking sandals, from various Tevas while I was growing up to my eventual introduction to Chacos. The first pair of Chacos I owned predated the heavy tread that followed in later years, when the lines of river and land shoes had almost identical soles. While I wasn't using a pair of their river shoes, mine gripped well on dry and wet rocks alike and dried quickly afterwards. With the addition of a pair of thick woollen socks (aww yeah, socks and sandals! Trendy, I know) so my feet didn't freeze, they made for decent rafting shoes. I could usually find them for around $100 a pair (although I once absurdly found a shop trying to clear some shelf space in a hurry who sold me several pairs at 20c each. Why, I have no idea!) and last me around three years of near-daily use before the soles start losing grip. They can be resoled, but generally only once since the straps eventually start to wear through.
Chaco soles from left to right: original multi-purpose colorado,
dry-land unaweep and wet-rock pro.
Photos courtesy of Chaco US and Wilderness Exchange Unlimited.
More recently, Chacos have diverged into two distinctly different styles: one with the solid, heavy soles of hiking boots; and one with limited tread and soft rubber soles that stuck easily to wet rocks but wore out faster on dry land. I mainly use mine on land as a warm weather shoe that actually has some support, and have stuck with the heavy tread. Alas, that means they're restricted to hiking and I needed to find a new source of river shoes.

#4 Dunlop Volleys

It took me a while to get there, but eventually I bought myself a pair of Dunlop Volleys, cheap canvas shoes whose design had remained largely unchanged for 70 years. They're a popular choice, and the Tasmanian University White Water Rafting Club has long recommended them as the footwear of choice for all new rafters. I forked out the standard $20 for a pair, grabbed some thick socks and tried them out. The grip was astonishing. It took me a while to fully trust them, but it felt like my feet were glued to the rocks. The only time they lost grip on river was when encountering green slime of death* unexpectedly. Since nothing else can find grip on green slime of death, I'm willing to forgive them that one. Like the Vibrams, the low tops meant they filled with sand easily, but it wasn't nearly as uncomfortable. An earlier model of Volley had a higher top that kept the sand out, but the end of that product line predated my use of Volleys by over twenty years.
By far the cheapest river shoes I'd owned, the Volleys also outlasted my Vibrams (which, if you're keeping track, were the most expensive). The canvas tends to wear through beside the little toe and the grip wears out, but neither happens instantly. I could get two seasons of rafting and occasional sessions of parkour out of a pair before they failed.

#5 Cheap'n'shitty Volleys

These sneaky shoes look like Dunlop Volleys, are sold in the same shops, have the same branding on their soles and are sold for a similar price. The only obvious difference is that the name on the shoes' tongues has changed from "DUNLOP" to "VOLLEY." However, one must never mistake Cheap'n'shitty Volleys for the shoes they're imitating...

Somewhere within the bowels of Volley Australia, a decision was made to bring back the old style of high-topped Volleys, rebranded as High Leaps. Excited at the prospect of not shaking gravel out of my shoes at day's end, I bought a pair and tried them out. I'd worn halfway through the grip under the ball of my foot after a 1 1/2 hour parkour training session on their first day of use. A few days of rafting later and holes were forming through the rubber. Despondent that they weren't as well made as other Volleys, I returned to using my old pair.


Then I went on a ten day rafting trip and bought a new pair of Volleys rather than relying on an old pair for so long. By the end of day three, the soles of both brand new shoes had partially detached from the canvas. I doused them liberally in glue and hoped they would last the remaining week. While I was still wearing my new shoes when we rolled up the rafts at trip's end, they were then deposited in the first bin I found. The additional glue had held them together admirably (one thing you can say for rafters is that they've always got powerful glues on hand) but I'd ultimately added duct tape around the toes to reinforce them. The tape would have diminished their grip, except that the grip had already worn away completely.


I started canyoning this year and was fortunate enough to still have my last pair of Dunlops, since the classic shoe has also been a popular choice for canyoners for some years. Although they're holding up well, old age is starting to catch up with them and I doubt they've more than a couple of days' canyoning left in them. With Volleys now a non-contender, I will soon have to delve back into the world of river shoes in search of a replacement.


* Green slime of death is a colloquial term for a type of algae found in some Tasmanian rivers. It's mostly found on rocks that are only intermittently submerged by higher water levels. When dry, it forms a dark green-hued coating on the rocks to which most shoes grip well. When it gets wet (for example, because someone has walked across it with wet shoes), it becomes a slick slime to which no shoes will grip. The result of this is that the first rafter walking across rocks coated with it has no problems, but anyone who carelessly follows their wet footprints a few seconds later is almost certain to slip over.


† A Wikipedia edit recently suggested these changes to the Volley design had been undone and they were reverting to the earlier construction, though didn't cite any evidence. Soon after, another edit was made to the page:


However, an October 2013 inspection of the various models sold in a department store found that all models on sale still had the much softer sole condemned as failing within 3 days in the references above, and there is no documentation at www.volley.com.au indicating that the soles of the online models are any different from those sold in stores.
It's a surprisingly strongly worded edit for something from a user calling himself BenevolentUncle, but a quick browse of the bushwalking forums and blogs of some big names in the Australian outdoor community make clear the widespread displeasure about the new Volley design. It remains to be seen whether Volley Australia will actually do as hoped and return to us our most beloved river shoes.

Wednesday, 23 October 2013

A Vegan Moroccan Feast

We were recently invited to a friend's house for a truly spectacular Chinese dinner. The host is a vegan and had prepared everything from steamed dumplings to cake, all without so much as a sniff of meat, egg or dairy products. I was impressed, but the meal also presented me with a problem: when hosting a meal in turn, how was I to cook something suitably impressive? I mostly cook vegetarian meals but have little experience cooking to vegan requirements.

I relish a good challenge and thoroughly enjoy trying to meet odd requirements. I've variously deprived my cooking of all sugars, fats, gluten and other such ingredients for a week or two at a time just to see what happened. So I approached this "problem" in much the same way.

First, I had to choose a theme. My usual go-to cuisines were off the list: Chinese and "Southeast Asian" would both have felt like imitations of her banquet; I briefly contemplated Italian but then realised I would have to omit cheese; my Mexican favourites, too, would suffer from a lack of dairy. So I went with Moroccan, largely because it let me cook one of my all-time favourite dishes, which just happens to be a vegan recipe already.

I looked around the net for some inspiration, set myself a menu and went about concocting recipes with every trace of egg or dairy removed. The resulting menu is below. To save this being a ridiculously long post, I've linked to the recipes separately rather than writing them all out in full here.

Entrees were dips and flatbread, a simple affair... or so I thought. One, a spicy carrot dip, was easily prepared the day before and stored in the fridge overnight. But the second dip proved a challenge. I wanted to have a sharp dip to balance the sweet carrot, and that could also accompany the main courses. I would usually make a yogurt-based dip to achieve this, but that wasn't an option with dairy off the cards. Instead of thinking up a different style of dip, I opted to create a dairy-free substitute for yogurt. It was a laborious process, and one that I have no interest in repeating, but eventually I manage to produce a reasonably tasty mint and "yogurt" dip.

For the main course, I dug out a favourite whose recipe I was given last summer: Winter Vegetable Tagine. I'd share the recipe here, but I'm under orders not to give it to anyone else... so I guess that one remains unpublished. The accompanying dishes are under no such restrictions. As has become traditional whenever making this particular tagine, I prepared a spiced rice dish, studded with nuts and currants. Since it promised to be a warm evening, a chickpea and couscous salad seemed an appropriate addition.


The next challenge came in the form of dessert. Again, because of the promised weather, I wanted something cold. Icecream sprang to mind, but suffers from a terrible case of containing cream. Sorbet? Egg whites, I'm afraid. So it had to be something different, and still fit into the Moroccan theme. I decided to experiment with using coconut cream to make icecream and, because the idea appealed to me, went for a rose-flavoured coconut icecream. This was only vaguely Moroccan in theme, so I added a honey and mint syrup cake to the mix.

Well, that wraps up the menu. Generally, I found it pretty easy to find vegan substitutes for ingredients. The exceptions being yogurt and, quite surprisingly, butter. I may have to explore the issue further in another post, but I was certainly shocked to discover how many dairy-free spreads are flavoured using dairy products. Vegetarian food may be fairly mainstream and easy to shop for in the supermarket, but clearly vegan has some way to go yet before its ingredients are so easily obtained.

Monday, 21 October 2013

Vegan Honey and Mint Syrup Cake

This cake is moist, rich and—above all—sweet. The recipe I use here differs only slightly from the original and those changes are largely to make a vegan version rather than my usual inability to follow recipes without making alterations along the way.

Ingredients:

  • Cake Batter
    • 160 g margarine*
    • 300 g sugar
    • 1 1/2 tsp chopped mint
    • 1 banana
    • 2 tbsp white vinegar
    • 2 tsp baking powder
    • 2 tbsp soy milk
    • 4 tbsp custard powder†
    • 180 g shredded coconut
    • 210 g self-raising flour
  • Syrup
    • 150 ml water
    • 135 g sugar
    • 1 1/2 cups roughyl chopped mint
  • Topping
    • 50 g margarine*
    • 120 g honey
    • 180 g sliced almonds
Directions:
  • Cake Batter
    • Preheat oven to 150°C/300°F (160°C/320°F non-fan-forced). Beat the margarine, sugar and mint until they become light and fluffy.
    • Mash banana to a fine puree and combine with custard powder and baking powder. Stirring constantly, add vinegar, baking powder, soy milk and 2 Tbsp water. The resulting liquid works as a the substitute for the raising, binding and moisturising properties of egg in most cake batters.
    • Adding small quantities at a time and beating between each, add egg substitute, coconut and flour to the beaten margarine.
    • Line a spring-form cake tin with baking paper. Even if the tin is non-stick, baking paper will be required for the base. Pour the batter into the tin and spread evenly. Bake for 1-1 1/2 hours until a skewer inserted into the centre comes out clean Remove from the oven and allow to rest for 10 minutes.
  • Syrup
    • Combine all ingredients in a saucepan over medium-high heat, stirring until sugar is dissolved. When it comes to the boil, remove from the heat and allow to cool. Leave for at least 45 minutes before using.
    • Strain to remove mint leaves immediately before using.
  • Assembling
    • Increase oven temperature to 170°C/340°F (180°C/355°F non-fan-forced). Leaving the cake in the tin, prick holes over 2 cm in the top. Pour the mint syrup over the cake and wait for it to soak in.
    • To prepare the topping, place margarine and honey‡ in a saucepan over medium heat and stir until combined. Stir through the almonds and remove from the heat without letting the mixture come to the boil.
    • Spread topping immediately over the top of the cake and place in the oven for 15 minutes until the top starts to darken. Allow to cool for half an hour before removing from the tin. Be careful when removing the cake from the tin, as the syrup softens it significantly.
* The majority of the margarines sold at your local supermarket are most distinctly not vegan, using milk solids to reproduce the flavour of butter. Check the ingredients before buying.

† In theory, custard powder is powdered eggs, cornflour and vanilla flavouring meant to reproduce an egg custard. However, cost cutting means that most custard powders don't contain egg any more. Check before you buy.

‡ There are two schools of thought on the vegan qualities of honey. Put simply: honey is vegan vs. honey is not vegan. To avoid getting bogged down in the debate, which runs deep, some less controversially vegan-friendly options are: agave syrup, maple syrup and golden syrup. Each has its own distinct flavour that it will impart, and the choice between them is down to individual taste.

Rose and Coconut Icecream (Vegan)

Making icecream without an icecream maker usually presents me with a challenge, one that I discussed in a post about sorbets. But making a vegan icecream presents another challenge. The lack of cream is the first obvious problem, with a few obvious solutions. I opted for basing my icecream on coconut instead, and flavouring it with rosewater as a suitable accompaniment. The second problem, though, is one of texture. Egg whites or yolks are generally used to make icecreams and sorbets smooth and light. Without them, I was floundering somewhat.

I suspected I could achieve the desired texture using gelatine, which is distinctly non-vegan (nor vegetarian, for that matter), so in theory agar-agar would work as well. Of course, I don't actually have agar-agar at home, and Canberra's various supermarkets and even health-food stores proved non-cooperative. So I tried to use cornflour instead, with some success.

Serves 6
Ingredients:
  • 400 ml coconut cream
  • 400 ml coconut milk
  • 3/4 cup sugar
  • 1 tsp rosewater
  • 2 tbsp cornflour
  • 1/2 tbsp beetroot juice*
  • 2 tbsp shredded coconut (optional)
Directions:
  • Combine 2 Tbsp coconut milk with cornflour and mix until smooth. Add to a saucepan with remaining coconut milk, coconut cream and sugar. Place over medium heat and bring to a simmer.
  • Stir mixture constantly until it thickens. Remove from heat and add rose water and shredded coconut (if using), stirring slowly as it cools.
  • Stir in beetroot juice when lukewarm. Whisk until thick and smooth, then transfer to a sealed container and freeze.
  • Remove from the freezer after two hours and stir, then return to freezer. Repeat every two hours until set.
* I had beetroot juice on hand since I was opening a can of beetroot for something else. If you don't have any on hand, use a few drops of red food colouring.

Chickpea and Couscous Salad

This light and tasty salad accompanies sweet main courses well, providing a sharper counterpoint flavour. It is a variation of a recipe from Mediterrasian.

Serves: 4
Ingredients:
  • 1 cup couscous
  • 1/2 cup sultanas
  • 3 cups boiling water
  • 1 1/2 tbs vegetable stock powder
  • 2 tbsp olive oil
  • 2 tbsp lime juice
  • 1 clove garlic, crushed
  • 1 tsp cumin, ground
  • 1 tsp coriander seeds, ground
  • 1 cm fresh ginger, finely grated
  • 1 carrot, peeled and coarsely grated
  • 1 red capsicum, diced
  • 1/2 red onion, diced
  • 1 400g can chickpeas, rinsed and drained
  • 1 1/2 tbsp coarsely chopped mint
 Directions:
  • Combine couscous, sultanas and stock powder. Pour through boiling water and cover.
  • Combine oil, lime juice and spices in a jug and whisk until emulsified.
  • When couscous has absorbed all stock, chill to room temperature then stir through all ingredients.
  • Serve.

Homemade Vegetable Stock Powder

Vegetable stock is pretty readily available in various cartons, powders and cubes. I've tried a few of them and been heartily disappointed by most. I know salt is needed to preserve the stocks and amplify their flavours, but they usually have so much salt that there are no other flavours to amplify. So I started making my own.

Initially, I tried dehydrating vegetables, grinding them and combining with salt. It worked, but the vegetables tended to rehydrate as small pieces rather than a stock when combined with boiling water. So I experimented with a few methods until I came up with this recipe. The quantities are only approximate and vary in every batch, because it depends on what leftover veggies I have lying around at the time. If you have plenty of fresh vegetables just waiting to be used, that's great. The advantage of this is you don't need them; when I make pumpkin soup, I reserve the skin to use in my next batch of stock. The same goes for carrots and sweet potato, provided they've been washed before being peeled. Have some mushrooms that have shriveled slightly in the fridge? Toss them in, too.

Ingredients:


  • 2 large onions, chopped into quarters
  • 2 large carrots, washed and chopped into chunks (or carrot peel, pumpkin skin, sweet potato peel, etc.)
  • 2 celery stalks, washed and cut into 4-5 cm lengths (or discarded celery leaves)*
  • 2 cups mushrooms
  • 1 leek, chopped into 4-5 cm lengths (or discarded leek leaves)*
  • 1 bay leaf
  • 1 tsp freshly ground pepper
  • Salt
Directions:
  • Add all ingredients apart from salt to a pot and almost cover with water. Bring to a boil then reduce to a simmer for 30 minutes. This isn't as long as most stocks, but remember that this is to make a powder, not liquid stock.
  • Remove from the heat and blend liquid and vegetables to a puree. This may need to be done in batches.
  • Poor onto trays of a dehydrator and set for vegetables. If you don't have a dehydrator, poor onto baking trays and put in an oven set to 55°C/130°F, propping the door slightly ajar to allow moisture to escape.
  • Dehydration times vary depending on how much liquid is in your puree and how thick the layers are. Stock may need to be flipped over when dehydrated to a leathery consistency to finish drying. When dried, it will be hard and brittle. Transfer to a mortar and pestle or spice grinder and grind to a fine powder.
  • Now you need to add the salt. This varies by personal taste and the final product can contain anywhere from 25-50% salt. To test, rehydrate 1 tsp powdered vegetables in 1 cup boiling water and add salt 1/4 tsp at a time, tasting between each addition. Take note of how much salt you add to meet your tastes. If, for example, you prefer 1/2 tsp of salt, combine powder vegetables and salt in a 2:1 ratio to produce your stock powder. Mix well and store in an air-tight container.
Note: This powder produces a light stock, but if you want something more akin to a dark beef stock, you can add 2 tsp promite/vegemite/marmite or your preferred black yeast concentrate spread of goodness to the mix before blending. Equally, you could combine a small quantity with your stock powder before adding the boiling water.

*Remove the roots, but the rest of the leeks and celery from the white to the leaves is usable.